main_page.xml
<?xml version="1.0" encoding="utf-8"?>
<LinearLayout android:id="@+id/linear1"
android:layout_weight="1" android:orientation="vertical"
android:layout_width="fill_parent" android:layout_height="fill_parent"
android:background="#ffffffff" xmlns:android="http://schemas.android.com/apk/res/android">
<LinearLayout android:id="@+id/linear2"
android:orientation="vertical" android:layout_width="fill_parent"
android:layout_height="wrap_content" xmlns:android="http://schemas.android.com/apk/res/android">
<ImageView android:id="@+id/test_image" android:src="@drawable/header"
android:layout_width="fill_parent" android:layout_height="fill_parent" />
</LinearLayout>
<GridView xmlns:android="http://schemas.android.com/apk/res/android"
android:id="@+id/gridview" android:layout_width="wrap_content"
android:layout_height="fill_parent" android:columnWidth="90dp"
android:numColumns="2" android:verticalSpacing="5dp"
android:horizontalSpacing="5dp" android:stretchMode="columnWidth"
android:gravity="center" android:background="@layout/black_white_gradient" />
</LinearLayout>
Home.class
import android.app.Activity;
import android.content.Intent;
import android.os.Bundle;
import android.view.View;
import android.view.Window;
import android.widget.AdapterView;
import android.widget.GridView;
import android.widget.Toast;
import android.widget.AdapterView.OnItemClickListener;
public class Home extends Activity {
/** Called when the activity is first created. */
@Override
public void onCreate(Bundle savedInstanceState) {
super.onCreate(savedInstanceState);
setContentView(R.layout.main_page);
GridView gridview = (GridView) findViewById(R.id.gridview);
gridview.setAdapter(new ImageAdapter(this));
getWindow().setFeatureInt(Window.FEATURE_CUSTOM_TITLE,
R.layout.custom_title);
gridview.setOnItemClickListener(new OnItemClickListener() {
@Override
public void onItemClick(AdapterView<?> parent, View v,
int position, long id) {
Intent myIntent = null;
String positionString = "";
switch (position) {
case 0:
// FlightInfo
positionString = "Flight Info";
myIntent = new Intent(Home.this, SearchFlights.class);
startActivity(myIntent);
break;
// case 1:
// // AirportInfo
// positionString = "Airport Info";
// myIntent = new Intent(Home.this, SearchFlights.class);
// startActivity(myIntent);
// break;
default:
break;
}
Toast.makeText(Home.this, "" + positionString,
Toast.LENGTH_SHORT).show();
}
});
}
}
ImageAdapter.class
import android.content.Context;
import android.view.View;
import android.view.ViewGroup;
import android.widget.BaseAdapter;
import android.widget.GridView;
import android.widget.ImageView;
public class ImageAdapter extends BaseAdapter {
private Context mContext;
public ImageAdapter(Context c) {
mContext = c;
}
@Override
public int getCount() {
return mThumbIds.length;
}
@Override
public Object getItem(int position) {
return null;
}
@Override
public long getItemId(int position) {
return 0;
}
// create a new ImageView for each item referenced by the Adapter
@Override
public View getView(int position, View convertView, ViewGroup parent) {
ImageView imageView;
if (convertView == null) { // if it's not recycled, initialize some
// attributes
imageView = new ImageView(mContext);
imageView.setLayoutParams(new GridView.LayoutParams(126, 126));
imageView.setScaleType(ImageView.ScaleType.CENTER_CROP);
imageView.setPadding(8, 8, 8, 8);
} else {
imageView = (ImageView) convertView;
}
imageView.setImageResource(mThumbIds[position]);
return imageView;
}
// references to our images
private Integer[] mThumbIds = { R.drawable.flight_info,
R.drawable.flight_schedule, R.drawable.check_in,
R.drawable.check_out };
}
list_view.xml
<?xml version="1.0" encoding="utf-8"?>
<LinearLayout xmlns:android="http://schemas.android.com/apk/res/android"
android:orientation="vertical"
android:layout_width="fill_parent"
android:layout_height="fill_parent"
>
<ListView
android:id="@+id/android:list"
android:layout_width="fill_parent"
android:layout_height="fill_parent"
/>
<TextView
android:id="@+id/android:empty"
android:layout_width="fill_parent"
android:layout_height="fill_parent"
android:text="@string/main_no_items"/>
</LinearLayout>
ListViewByFligh.class
import java.util.ArrayList;
import java.util.HashMap;
import java.util.List;
import com.al.srv.dto.FlightVO;
import com.al.srv.parser.Parser;
import com.serendibit.flightstats.webservice.WebserviceClient;
import android.app.ListActivity;
import android.app.ProgressDialog;
import android.content.Context;
import android.content.Intent;
import android.os.Bundle;
import android.util.Log;
import android.view.LayoutInflater;
import android.view.View;
import android.view.ViewGroup;
import android.widget.ArrayAdapter;
import android.widget.TextView;
public class ListViewByFlight extends ListActivity {
private ProgressDialog m_ProgressDialog = null;
private ArrayList<FlightVO> m_flights = null;
private FlightsAdapter m_adapter;
private Runnable viewFlights;
Intent myIntent = null;
private String strAirLine, strFlightNo, strFlightFromDate, strFlightToDate;
public static SearchByFlightNo byFlightNo;
@Override
public void onCreate(Bundle savedInstanceState) {
super.onCreate(savedInstanceState);
setContentView(R.layout.list_view_by_flight);
strAirLine = byFlightNo.getStrAirLine();
strFlightNo = byFlightNo.getStrFlightNo();
strFlightFromDate = byFlightNo.getStrFlightFromDate();
strFlightToDate = byFlightNo.getStrFlightToDate();
m_flights = new ArrayList<FlightVO>();
this.m_adapter = new FlightsAdapter(this, R.layout.row, m_flights);
setListAdapter(this.m_adapter);
viewFlights = new Runnable() {
@Override
public void run() {
getFlights();
}
};
Thread thread = new Thread(null, viewFlights, "MagentoBackground");
thread.start();
m_ProgressDialog = ProgressDialog.show(ListViewByFlight.this,
"Please wait...", "Retrieving data ...", true);
}
private Runnable returnRes = new Runnable() {
@Override
public void run() {
if (m_flights != null && m_flights.size() > 0) {
m_adapter.notifyDataSetChanged();
for (int i = 0; i < m_flights.size(); i++)
m_adapter.add(m_flights.get(i));
}
m_ProgressDialog.dismiss();
m_adapter.notifyDataSetChanged();
}
};
private void getFlights() {
try {
int count = 0;
int objLength;
// Call flight info web service
WebserviceClient client = new WebserviceClient();
String resultXML = client.getFlightInfoByFlightNo(strAirLine,
strFlightNo, strFlightFromDate, strFlightToDate);
Object obj = new Parser().parse(resultXML);
if (obj instanceof String) {
// SearchByFlightNo.error =
// "Incorrect parameter or Connection error";
myIntent = new Intent(ListViewByFlight.this,
SearchByFlightNo.class);
startActivity(myIntent);
} else if (obj instanceof List) {
m_flights = new ArrayList<FlightVO>();
FlightVO o1;
List<HashMap<String, String>> fillMaps = new ArrayList<HashMap<String, String>>();
for (count = 0; count < ((List<FlightVO>) obj).size(); count++) {
o1 = new FlightVO();
o1.setFlightNumber(((List<FlightVO>) obj).get(count)
.getAirline().getAirlineCode()
+ ((List<FlightVO>) obj).get(count)
.getFlightNumber());
o1.setDepartureDate(((List<FlightVO>) obj).get(count)
.getDepartureDate().substring(0, 10)
+ " "
+ ((List<FlightVO>) obj).get(count)
.getDepartureDate().substring(11, 16));
o1.setFlyRoot("from ("
+ ((List<FlightVO>) obj).get(count).getOrigin()
.getAirportCode()
+ ") to "
+ "("
+ ((List<FlightVO>) obj).get(count).getDestination()
.getAirportCode() + ")");
m_flights.add(o1);
}
}
Thread.sleep(5000);
Log.i("ARRAY", "" + m_flights.size());
} catch (Exception e) {
Log.e("BACKGROUND_PROC", e.getMessage());
}
runOnUiThread(returnRes);
}
private class FlightsAdapter extends ArrayAdapter<FlightVO> {
private ArrayList<FlightVO> items;
public FlightsAdapter(Context context, int textViewResourceId,
ArrayList<FlightVO> items) {
super(context, textViewResourceId, items);
this.items = items;
}
@Override
public View getView(int position, View convertView, ViewGroup parent) {
View v = convertView;
if (v == null) {
LayoutInflater vi = (LayoutInflater) getSystemService(Context.LAYOUT_INFLATER_SERVICE);
v = vi.inflate(R.layout.row, null);
}
FlightVO o = items.get(position);
if (o != null) {
TextView tvFlightNo = (TextView) v
.findViewById(R.id.flightNumber);
TextView tvDateTime = (TextView) v.findViewById(R.id.dateTime);
if (tvFlightNo != null) {
tvFlightNo.setText("Flight: " + o.getFlightNumber());
}
if (tvDateTime != null) {
tvDateTime.setText("Fly Date: "
+ o.getDepartureDate()
+ "\nRoot: "
+ o.getFlyRoot());
}
}
return v;
}
}
}
WebserviceClient.class
import java.io.BufferedReader;
import java.io.InputStream;
import java.io.InputStreamReader;
import org.apache.http.HttpResponse;
import org.apache.http.client.HttpClient;
import org.apache.http.client.methods.HttpGet;
import org.apache.http.impl.client.DefaultHttpClient;
import android.util.Log;
public class WebserviceClient {
String URLbase = "http://www.pathfinder-xml.com/development/xml?Service=FlightHistoryGetRecordsService&login.accountID=6686&login.userID=nhliyanage&login.password=nandika";
private String call(String url) {
Log.i("URL :", url);
String content = null;
HttpClient mClient = new DefaultHttpClient();
HttpGet get = new HttpGet(url);
try {
mClient.execute(get);
HttpResponse res = mClient.execute(get);
InputStream is = res.getEntity().getContent();
BufferedReader rd = new BufferedReader(new InputStreamReader(is));
String line;
StringBuffer response = new StringBuffer();
while ((line = rd.readLine()) != null) {
response.append(line);
response.append('\r');
}
rd.close();
content = response.toString();
System.out.println("content :" + content);
} catch (Exception e) {
e.printStackTrace();
}
return content;
}
public String getFlightInfoByFlightNo(String airlineCode, String flightNo,
String fromDate, String toDate) {
String url = URLbase
+ "&info.specificationFlights[0].airline.airlineCode="
+ airlineCode + "&info.specificationFlights[0].flightNumber="
+ flightNo
+ "&info.specificationFlights[0].searchCodeshares=true"
+ "&info.specificationDateRange.departureDateTimeMin="
+ fromDate + "T00:00"
+ "&info.specificationDateRange.departureDateTimeMax=" + toDate
+ "T23:59";
return call(url);
}
public String getFlightInfoByDestination(String from, String to,
String fromDate, String toDate) {
String url = URLbase
+ "&info.specificationDepartures[0].airport.airportCode="
+ from + "&info.specificationArrivals[0].airport.airportCode="
+ to + "&info.specificationDateRange.departureDateTimeMin="
+ fromDate + "T00:00"
+ "&info.specificationDateRange.departureDateTimeMax=" + toDate
+ "T23:59"
+ "&info.flightHistoryGetRecordsRequestedData.codeshares=true";
return call(url);
}
}
Friday, October 7, 2011
Thursday, October 6, 2011
How to develop games on Android
One of the biggest markets in smart phones is games. I am sure most of us would have played around with “Angry Birds” . In this games tutorial you will learn different methods of developing “Android Games”
At the end of the post is the video on how the code below works and the zip of all the source files used in this example.
Android Games can be developed in 3 ways
1) Developing games using Android/Java libraries
2) Developing games using External Libraries like OpenGL
3) Developing games by porting existing c-game (pc game) to android.
Before getting started I assume that the reader is familiar with the basics of android programming like using activity, creating views, handling motion/touch events etc.
Also, apart from android sdk and eclipse some other tools are required for the game development. Details of the tools required, how to configure and use them will be explained as and when required. I will recommend to check out our last posts
Before starting with the game development lets understand the term “Main Loop”.
E.g. consider two games (i) Android Snake Game (ii) Android Number Game for kids as shown.


In android snake game the snake has to move irrespective of the user input. Here the screen has to regularly re-drawn/re-painted to create the motion effect of the snake. Where as in the Number game we need not redraw the screen now and then. The screen must be updated/re-drawn only when the user clicks/touches the screen.
So in the snake game we must re-draw the screen at regular intervals say 1sec in order to do that we make use of threads, while loops etc. and create a refresh/re-draw handler that updates screen regularly. This refresh/re-draw loop created is called “Main Loop”.
Note: It’s not that all games require Main Loop it depends on the game you are building.
In order to understand refresh handler we shall build a
“Ball Game” . In this game the user gets some points when ever he clicks on the ball, when the ball in the circle of the same color, here I’m neither going to explain the score logic nor the UI events all that I’m going to focus on is the game view and refresh handler.

Before dicing into this code, I will recommend going through
Here the random function is used to select random position on the screen while the balls are falling down from the top
random X-axis position every second and repaints the screen this creates a feel as if balls are falling from the top
At the end of the post is the video on how the code below works and the zip of all the source files used in this example.
Android Games can be developed in 3 ways
1) Developing games using Android/Java libraries
2) Developing games using External Libraries like OpenGL
3) Developing games by porting existing c-game (pc game) to android.
Before getting started I assume that the reader is familiar with the basics of android programming like using activity, creating views, handling motion/touch events etc.
Also, apart from android sdk and eclipse some other tools are required for the game development. Details of the tools required, how to configure and use them will be explained as and when required. I will recommend to check out our last posts
Before starting with the game development lets understand the term “Main Loop”.
Main Loop:
Not just android any game written on any language consists of a set of custom views which are constantly refreshed/re-painted/re-drawn. In some games we need to update the screen or re-draw the view elements at regular intervals.E.g. consider two games (i) Android Snake Game (ii) Android Number Game for kids as shown.


In android snake game the snake has to move irrespective of the user input. Here the screen has to regularly re-drawn/re-painted to create the motion effect of the snake. Where as in the Number game we need not redraw the screen now and then. The screen must be updated/re-drawn only when the user clicks/touches the screen.
So in the snake game we must re-draw the screen at regular intervals say 1sec in order to do that we make use of threads, while loops etc. and create a refresh/re-draw handler that updates screen regularly. This refresh/re-draw loop created is called “Main Loop”.
Note: It’s not that all games require Main Loop it depends on the game you are building.
In order to understand refresh handler we shall build a
“Ball Game” . In this game the user gets some points when ever he clicks on the ball, when the ball in the circle of the same color, here I’m neither going to explain the score logic nor the UI events all that I’m going to focus on is the game view and refresh handler.
Before dicing into this code, I will recommend going through
Creating a Custom Widget in android
public class ballview extends View{Initialize all the variables. The image files can be downloaded from the zip file attached to the post.
/* Refer to the above link for more information on using View class */
int width,height;
private Paint circlePaint,circlePaint1,circlePaint2,circlePaint3;
private Drawable[] mDrawable;
/* This will start your Refresh Handler */
private RefreshHandler mRedrawHandler=new RefreshHandler();
private int[] posx,posy;
/* Create different constructors for your view class */
public ballview(Context context, AttributeSet attrs, int defStyle) {
super(context, attrs, defStyle);
initCalview();
}
/* Create different constructors for your view class */
public ballview(Context context, AttributeSet attrs) {
super(context, attrs);
initCalview();
}
/* Create different constructors for your view class */
public ballview(Context context) {
super(context);
initCalview();
}
Here the random function is used to select random position on the screen while the balls are falling down from the top
protected void initCalview()
{More information on onMeasure method can be found on Creating a Custom Widget in android
mDrawable=new Drawable[4];
posx=new int[16];
posy=new int[16];
mDrawable[0] = this.getResources().getDrawable(R.drawable.bluen);
mDrawable[1] = this.getResources().getDrawable(R.drawable.greenn);
mDrawable[2] = this.getResources().getDrawable(R.drawable.redn);
mDrawable[3] = this.getResources().getDrawable(R.drawable.yellown);
for(int i=0;i<16;i++)
{
posx[i]=(int)(Math.random() * (250- 1 + 1) ) + 1;
posy[i]=(int)(Math.random() * (250 – 1 + 1) ) + 1;
}
}
@OverrideRefreshHandler class : This class updates the view every sec. It increments the Y-axis value and selects the
protected void onMeasure(int widthSpec, int heightSpec)
{
int specWidth=MeasureSpec.getSize(widthSpec);
int specHeight=MeasureSpec.getSize(heightSpec);
setMeasuredDimension(specWidth,specHeight);
set_pos();
}
public void set_pos()
{
int x;
int px=this.getMeasuredWidth();
int py=this.getMeasuredHeight();
width=(int)px;
height=(int)py;
this.layout(width/2, 0, 0, 0);
/* Initialize different paint objects to draw circles of different colors */
circlePaint=new Paint(Paint.ANTI_ALIAS_FLAG);
circlePaint.setColor(Color.BLUE);
circlePaint.setStrokeWidth(1);
circlePaint.setStyle(Paint.Style.STROKE);
circlePaint1=new Paint(Paint.ANTI_ALIAS_FLAG);
circlePaint1.setStrokeWidth(1);
circlePaint1.setStyle(Paint.Style.STROKE);
circlePaint2=new Paint(Paint.ANTI_ALIAS_FLAG);
circlePaint2.setStrokeWidth(1);
circlePaint2.setStyle(Paint.Style.STROKE);
circlePaint3=new Paint(Paint.ANTI_ALIAS_FLAG);
circlePaint3.setStrokeWidth(1);
circlePaint3.setStyle(Paint.Style.STROKE);
}
@Override
protected void onDraw(Canvas canvas)
{
int rad=Math.min(width/4, height/4);
/* Paint the circle objects on the canvas */
canvas.drawCircle(width/4,height/4, rad, circlePaint);
circlePaint1.setColor(Color.RED);
canvas.drawCircle(width-rad,height-rad, rad, circlePaint1);
circlePaint2.setColor(Color.YELLOW);
canvas.drawCircle(width-rad,height/4,rad/2, circlePaint2);
circlePaint3.setColor(Color.GREEN);
canvas.drawCircle(width/4,height-rad, rad/2, circlePaint3);
//int i=0;
for(int i=0;i<8;i++)
{
mDrawable[0].setBounds(posx[i],posy[i],posx[i]+35,posy[i]+35);
mDrawable[0].draw(canvas);
i++;
mDrawable[1].setBounds(posx[i],posy[i],posx[i]+35,posy[i]+35);
mDrawable[1].draw(canvas);
i++;
mDrawable[2].setBounds(posx[i],posy[i],posx[i]+35,posy[i]+35);
mDrawable[2].draw(canvas);
i++;
mDrawable[3].setBounds(posx[i],posy[i],posx[i]+35,posy[i]+35);
mDrawable[3].draw(canvas);
/* Refresh Handler re-draws the view and at this point waits/stops for a sec and after the
waiting period it again redraws the view and the process repeats.
Thus your screen gets updated regularly and you feel as if balls are falling from the top*/
mRedrawHandler.sleep(1000);
}
}
random X-axis position every second and repaints the screen this creates a feel as if balls are falling from the top
class RefreshHandler extends Handler {/* Now Create an Activity and Display the View created above */
@Override
public void handleMessage(Message msg) {
for(int i=0;i<8;i++)
{
posy[i]=posy[i]+20;
posx[i]=(int)(Math.random() * (250- 1 + 1) ) + 1;
if(posy[i]<height)
{}
else
{posy[i]=0;}
}
ballview.this.invalidate();
}
public void sleep(long delayMillis) {
this.removeMessages(0);
sendMessageDelayed(obtainMessage(0), delayMillis);
}
};
}
public class main extends Activity {@Overridepublic void onCreate(Bundle savedInstanceState) {super.onCreate(savedInstanceState);LinearLayout linear=new LinearLayout(this);ballview ball= new ballview(this);linear.addView(ball);setContentView(linear);}}
Parsing JSON Results in Android
One of the common requirements for an android programmer is how to parse incoming JSON results from another web service or application into android. JSON is a data interchange format, and serves the same purpose as that of XML. XML is slowly being replaced by JSON because it’s easy to parse, light weight, and efficient too. We had talked about SOAP vs JSON earlier and not going to go into details again.
Let us focus on how to parse JSON results in Android.
We can parse JSON by 2 methods
i) Using JSONObject and JSONTokener classes provided by Android SDK.
ii) Using external libraries. E.g GSON, Jackson etc.
(for more details refer http://json.org)
Let’s consider JSON data of the form:
Let us focus on how to parse JSON results in Android.
We can parse JSON by 2 methods
i) Using JSONObject and JSONTokener classes provided by Android SDK.
ii) Using external libraries. E.g GSON, Jackson etc.
(for more details refer http://json.org)
Let’s consider JSON data of the form:
{
“name”: “myName”,
“message”: ["myMessage1","myMessage2"],
“place”: “myPlace”,
“date”: ”thisDate”
}
“name”: “myName”,
“message”: ["myMessage1","myMessage2"],
“place”: “myPlace”,
“date”: ”thisDate”
}
Parsing JSON data using JSONTokener
public class main extends Activity {
@Override
public void onCreate(Bundle savedInstanceState) {
super.onCreate(savedInstanceState);
setContentView(R.layout.main);
try {
/* Inflate TextView from the layout */
TextView tv = (TextView)findViewById(R.id.TextView01);
/* JSON data considered as an example. Generally this data is obtained
from a web service.*/
String json = “{”
+ “ \”name\”: \”myName\”, ”
+ “ \”message\”: [\"myMessage1\",\"myMessage2\"],”
+ “ \”place\”: \”myPlace\”, ”
+ “ \”date\”: \”thisDate\” ”
+ “}”;
/* Create a JSON object and parse the required values */
JSONObject object = (JSONObject) new JSONTokener(json).nextValue();
String name = object.getString(“name”);
String place = object.getString(“place”);
String date = object.getString(“date”);
JSONArray message = object.getJSONArray(“message”);
tv.setText(“Name: “+ name +”\n\n”);
tv.append(“Place: “+ place +”\n\n”);
tv.append(“Date: “+ date +”\n\n”);
for(int i=0;i<message.length();i++)
{
tv.append(“Message: “+ message.getString(i) +”\n\n”);
}
} catch (JSONException e) {e.printStackTrace();}
catch(Exception ex){ex.printStackTrace();}
}
}
Tuesday, May 31, 2011
Installing iOS SDK and Xcode on Windows 7
Apple has been adamantly refusing to create an iPhone SDK support for Windows-based machines. Luckily, there is a work around to be able to fully run the iOS SDK and Xcode support for most all PC's.
The following steps involve installing a virtual machine on your PC, updating the virtual machine to 10.6.5, then running the machine and downloading and installing the iOS SDK and Xcode on to the virtual machine.
There are other ways to install OS X on your machine but they involve creating a new partition and installing the Operating System directly to your hard drive. Those ways are much harder and have more confusing steps that could potentially damage your computer. This method is easier and safer to use.
The process will take 3-4 hours, but most of the time is consumed by large downloads. There's no software to buy or developer fees to pay.
Instructions
1. Follow the steps here to download and install a virtualized version of OS X on your PC.
2. Make sure you have updated to the latest version of OS X, Xcode won't work with older versions of OS X.
3. Once you've updated, in the virtual machine, go to the the Apple Developer page. Create a new account. Then go to the downloads page.
4. Scroll down to the downloads. Click on Xcode and iOS SDK. The download will likely take around 1 hour but depending on your connection, it could take longer.

5. Once the download is finished, double-click on the .dmg file, then click on Xcode and iPhone SDK.

6. Follow the on-screen directions then wait for the installation to finish.

7. Once it's done, you will NOT find the iPhone SDK in your dock. You will need to click on your hard drive (the icon at the top right of your screen). Then Click on Developer, then on Applications.
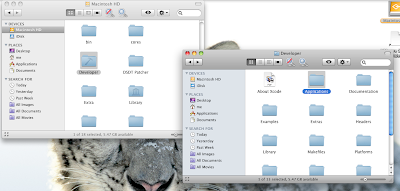
8. You will now see an icon for Xcode, click it and you can start coding applications.

If the icons don't show up, you may not have enough virtual hard drive space to fit the program. Make sure you have at least 10 GB of free memory in the virtual machine. Restarting your machine may be another way to make the icon appear.
Now you can start coding an app for your personal use. You will be able to test your app on the iPhone simulator in Xcode but you will not be able to add the app to your own device. To add an app that you've created to your device, see the two options below.
Option 1: If you want to submit your app to the App Store, you will need to pay Apple $100 for an official Developers Certificate. This will allow you to sell your app to a very large audience but Apple does place large restrictions on its approval of submissions.
Option 2: If you don't want to pay the $100, you can develop your application for Cydia (similar to the App Store). This option will also allow you to place your app on to your iPhone, not just only in the Xcode simulator.
Cydia is the unofficial App Store for users who have jailbroken and want to sell/share their apps. There are almost no restrictions as to what kind of apps that can be added to Cydia.
To develop for Cydia, you will need to have your device jailbroken (How do I jailbreak?) and before you start developing your app, you will need to follow these steps to create an alternate Certificate.
How to Virtualize OS X on Windows 7
With newer computers, it is now possible to run two Operating Systems at once, one running inside of another. This guide will describe the process of running Mac OS X 10.6.2 on a machine already running Windows 7 or Vista. This process will likely work on Windows XP but has not been tested.
This will enable you to run all programs for the Mac Operating System on your PC.
Requirements
A laptop or desktop computer that supports virtualization (most newer computers do).
At least 1 GB of RAM (the more, the better).
VMware Player (virtualization software, you will need to create a free account).
Snow Leopard 10.6.2 (Operating System).
Snowy_VM.zip (extra files for installation).
Instructions
Before you start, make sure that you have enabled Virtualization in the BIOS of your computer. This is usually disabled by default by computer manufacturers.
1. Unzip Snowy_VM and navigate to the following file: Snowy_VM\Snowy_VM\Mac OS X Server 10.6 (experimental).vmwarevm\Mac OS X Server 10.6 (experimental).vmx.
Double click this file, it will open VMware Player.
2. You should see a black screen now. On the blue VMware bar, press Virtual Machine > Virtual Machine Settings > CD/DVD > Settings.
3. On the left, click Use ISO image file, then click Browse.
4. Now select the Snow Leopard 10.6.2 iso file downloaded from the torrent above. Press OK to close the box and return to the black screen.
5. On the blue VMware bar, press Virtual Machine > Send Ctrl + Alt + Del. The machine will now boot up with the iso file. Once the text appears, press F8 on your keyboard.
This is the screen where you can enter in boot flags. Depending on your computer, you may have a different flag from another computer. Many computers have worked without boot flag, so try that first (just press Enter).
A gray screen will appear. In a few moments, a language box will appear. If it does, go down to step 6.
If this screen doesn't appear for 10 minutes you will need to enter a boot flag. Go to the blue VMware bar, press Virtual Machine > Power > Reset. Press F8 at the same screen again. Now enter -x -v busratio=20 cpus=1 arch=i386 -x32. If you get to the language screen, move to step 6.
If you still don't get the language screen, press Virtual Machine > Power > Reset. Press F8 at the same screen again. Now enter -v at the boot screen. This will allow you to figure out exactly where the problem is computer is freezing. You can then Google your error.
6. Follow the on-screen steps until you reach Install Summary.
7. Here, click on Customize.
8. Select Mac OS_X_10.6.2. Under Kernels, select Legacy_kernel_10.2.0. Under Graphic_Drivers, select GraphicEnabler. Click Done.Click Install. This process should take around 10-15 minutes.
9. Once it's done, the count down from Step 5 will appear, press F8. Then on the blue VMware bar, press Virtual Machine > Virtual Machine Settings > CD/DVD > Settings.
10. Now go to Snowy_VM\Snowy_VM\darwin_snow.iso.
11. On the blue VMware bar, press Virtual Machine > Send Ctrl + Alt + Del.
12. Now wait until OS X 10.6.2 boots up! Just follow the simple setup instructions to create your user account and you'll be on OS X Snow Leopard. If the boot time is extremely long, go to the blue VMware bar, press Virtual Machine > Power > Power off. Then double click the name of your machine in the left column to start it up again.
13. When shutting down the machine, use the X in the top right corner or use the blue VMware bar, press Virtual Machine > Power > Power off.
14. Now to update to the latest OS X version, follow steps 2-4 on this guide:
http://techexxpert.blogspot.com/2011/04/updating-virtualized-os-x-1067.html
15. To enable an internet connection on the OS X machine, see this guide:
http://techexxpert.blogspot.com/2011/02/enable-internet-on-vmware.html
16. To enable sound and get a full-screen native resolution working see this guide: http://techexxpert.blogspot.com/2011/02/change-resolution-of-vmware-system.html
Follow this video tutorial
http://www.youtube.com/watch?v=_xBqohlSTis&feature=player_embedded#at=34
Thanks....
Monday, November 1, 2010
Step by step to access webservice from android
How to access webservice from android mobile application
System Requirements
The sections below describe the system and software requirements for developing Android applications using the Android SDK.
Supported Operating Systems
- Windows XP (32-bit) or Vista (32- or 64-bit)
- Mac OS X 10.5.8 or later (x86 only)
- Linux (tested on Linux Ubuntu Hardy Heron)
Supported Development Environments
Eclipse IDE
- Eclipse 3.4 (Ganymede) or 3.5 (Galileo)
Caution: There are known issues with the ADT plugin running with Eclipse 3.6. Please stay on 3.5 until further notice.
- Eclipse JDT plugin (included in most Eclipse IDE packages)
- If you need to install or update Eclipse, you can download it from http://www.eclipse.org/downloads/.
Several types of Eclipse packages are available for each platform. For developing Android applications, we recommend that you install one of these packages:
- Eclipse IDE for Java EE Developers
- Eclipse IDE for Java Developers
- Eclipse for RCP/Plug-in Developers
- Eclipse Classic (versions 3.5.1 and higher)
- JDK 5 or JDK 6 (JRE alone is not sufficient)
- Android Development Tools plugin (optional)
- Not compatible with Gnu Compiler for Java (gcj)
Hardware requirements
The Android SDK requires disk storage for all of the components that you choose to install. The table below provides a rough idea of the disk-space requirements to expect, based on the components that you plan to use.
Component type | Approximate size | Comments |
SDK Tools | 50 MB | Required. |
Android platform (each) | 150 MB | At least one platform is required. |
SDK Add-on (each) | 100 MB | Optional. |
USB Driver for Windows | 10 MB | Optional. For Windows only. |
Samples (per platform) | 10M | Optional. |
Offline documentation | 250 MB | Optional. |
· Note that the disk-space requirements above are in addition to those of the Eclipse IDE, JDK, or other prerequisite tools that you may need to install on your development computer.
Installing the ADT Plugin for Eclipse
- Start Eclipse, then select Help > Install New Software.
- In the Available Software dialog, click Add....
- In the Add Site dialog that appears, enter a name for the remote site (for example, "Android Plugin") in the "Name" field.
In the "Location" field, enter this URL:
https://dl-ssl.google.com/android/eclipse/
Note: If you have trouble acquiring the plugin, you can try using "http" in the URL, instead of "https" (https is preferred for security reasons).
Click OK.
- Back in the Available Software view, you should now see "Developer Tools" added to the list. Select the checkbox next to Developer Tools, which will automatically select the nested tools Android DDMS and Android Development Tools. Click Next.
- In the resulting Install Details dialog, the Android DDMS and Android Development Tools features are listed. Click Next to read and accept the license agreement and install any dependencies, then click Finish.
- Restart Eclipse.
Configuring the ADT Plugin
Once you've successfully downloaded ADT as described above, the next step is to modify your ADT preferences in Eclipse to point to the Android SDK directory:
- Select Window > Preferences... to open the Preferences panel (Mac OS X: Eclipse > Preferences).
- Select Android from the left panel.
- For the SDK Location in the main panel, click Browse... and locate your downloaded SDK directory.
Creating an Android Project
The ADT plugin provides a New Project Wizard that you can use to quickly create a new Android project (or a project from existing code). To create a new project:- Select File > New > Project.
- Select Android > Android Project, and click Next.
- Select the contents for the project:
- Enter 'AndroidWSAccess'. This will be the name of the folder where your project is created.
- Under Contents, select Create new project in workspace. Select your project workspace location.
- Under Target, select an Android target to be used as the project's Build Target. The Build Target specifies which Android platform you'd like your application built against. Unless you know that you'll be using new APIs introduced in the latest SDK, you should select a target with the lowest platform version possible.
Note: You can change your the Build Target for your project at any time: Right-click the project in the Package Explorer, select Properties, select Android and then check the desired Project Target. - Under Properties, fill in all necessary fields.
- Enter an Application name as 'AndroidWSAccess'. This is the human-readable title for your application — the name that will appear on the Android device.
- Enter a Package name as 'com.test.android'. This is the package namespace (following the same rules as for packages in the Java programming language) where all your source code will reside.
- Select Create Activity (optional, of course, but common) and enter a name (give 'FirstAppUI') for your main Activity class .
- Enter a Min SDK Version. This is an integer that indicates the minimum API Level required to properly run your application. Entering this here automatically sets the
minSdkVersionattribute in the <uses-sdk> of your Android Manifest file. If you're unsure of the appropriate API Level to use, copy the API Level listed for the Build Target you selected in the Target tab.
- Click Finish.
Tip: You can also start the New Project Wizard from the New icon in the toolbar.
Once you complete the New Project Wizard, ADT creates the following folders and files in your new project:src/- Includes your stub Activity Java file. All other Java files for your application go here.
<Android Version>/(e.g.,Android 2.2/)- Includes the
android.jarfile that your application will build against. This is determined by the build target that you have chosen in the New Project Wizard. gen/- This contains the Java files generated by ADT, such as your
R.javafile and interfaces created from AIDL files. assets/- This is empty. You can use it to store raw asset files.
res/- A folder for your application resources, such as drawable files, layout files, string values, etc.
AndroidManifest.xml- The Android Manifest for your project.
default.properties- This file contains project settings, such as the build target. This files is integral to the project, as such, it should be maintained in a Source Revision Control system. It should never be edited manually — to edit project properties, right-click the project folder and select "Properties".
Creating an AVD
An Android Virtual Device (AVD) is a device configuration for the emulator that allows you to model real world devices. In order to run an instance of the emulator, you must create an AVD.To create an AVD from Eclipse:
- Select Window > Android SDK and AVD Manager, or click the Android SDK and AVD Manager icon in the Eclipse toolbar.
- In the Virtual Devices panel, you'll see a list of existing AVDs. Click New to create a new AVD.
- Fill in the details for the AVD. Give it a name, a platform target, an SD card size, and a skin (HVGA is default).
Note: Be sure to define a target for your AVD that satisfies your application's Build Target (the AVD platform target must have an API Level equal to or greater than the API Level that your application compiles against). - Click Create AVD.
Code your FirstAppUI.java class like bellow.
package com.test.android;

import org.ksoap2.SoapEnvelope;
import org.ksoap2.serialization.SoapObject;
import org.ksoap2.serialization.SoapSerializationEnvelope;
import org.ksoap2.transport.HttpTransportSE;

import android.app.Activity;
import android.os.Bundle;
import android.widget.ArrayAdapter;
import android.widget.AutoCompleteTextView;

public class FirstAppUI extends Activity {


 private static final String NAMESPACE = "com.service.ServiceImpl";
 private static final String URL = "http://192.168.202.124:9000/AndroidWS/wsdl/ServiceImpl.wsdl";
 private static final String SOAP_ACTION = "ServiceImpl";
 private static final String METHOD_NAME = "message";

 private static final String[] sampleACTV = new String[] {
 "android", "iphone", "blackberry"
 };

 @Override
 public void onCreate(Bundle savedInstanceState) {
  super.onCreate(savedInstanceState);
  setContentView(R.layout.main);
  ArrayAdapter<String> arrAdapter = new ArrayAdapter<String>(this, android.R.layout.simple_dropdown_item_1line, sampleACTV);

  AutoCompleteTextView ACTV = (AutoCompleteTextView)findViewById(R.id.AutoCompleteTextView01);
  ACTV.setAdapter(arrAdapter);

  SoapObject request = new SoapObject(NAMESPACE, METHOD_NAME);
  SoapSerializationEnvelope envelope = new SoapSerializationEnvelope(SoapEnvelope.VER11);

  envelope.setOutputSoapObject(request);
  HttpTransportSE androidHttpTransport = new HttpTransportSE(URL);

  try {
   androidHttpTransport.call(SOAP_ACTION, envelope);
   SoapObject resultsRequestSOAP = (SoapObject) envelope.bodyIn;
   ACTV.setHint("Received :" + resultsRequestSOAP.toString());
  } catch (Exception e) {
   e.printStackTrace();
  }

 }
}
Insert AutoCompleteTextView to your res>layout >main.xml as
<?xml version="1.0" encoding="utf-8"?>
<LinearLayout android:id="@+id/LinearLayout01"
     android:layout_width="fill_parent"
     android:layout_height="fill_parent"
     xmlns:android="http://schemas.android.com/apk/res/android">

     <AutoCompleteTextView
         android:id="@+id/AutoCompleteTextView01"
         android:layout_width="wrap_content"
         android:layout_height="wrap_content"
         android:hint="This is Hint"
         android:width="240px" />

 </LinearLayout>
Insert Internet access permision to your mobile application in AndroidManifest.xml file as
<?xml version="1.0" encoding="utf-8"?>
<manifest xmlns:android="http://schemas.android.com/apk/res/android"
      package="com.test.android"
      android:versionCode="1"
      android:versionName="1.0">
    <application android:icon="@drawable/icon" android:label="@string/app_name">
        <activity android:name=".FirstAppUI"
                  android:label="@string/app_name">
            <intent-filter>
                <action android:name="android.intent.action.MAIN" />
                <category android:name="android.intent.category.LAUNCHER" />
            </intent-filter>
        </activity>
    </application>
    <uses-permission android:name="android.permission.INTERNET"></uses-permission>
    <uses-sdk android:minSdkVersion="8" />

</manifest>
ServiceImpl.wsdl
<?xml version="1.0" encoding="UTF-8"?>
<wsdl:definitions targetNamespace="http://service.com" xmlns:apachesoap="http://xml.apache.org/xml-soap" xmlns:impl="http://service.com" xmlns:intf="http://service.com" xmlns:wsdl="http://schemas.xmlsoap.org/wsdl/" xmlns:wsdlsoap="http://schemas.xmlsoap.org/wsdl/soap/" xmlns:xsd="http://www.w3.org/2001/XMLSchema">
<!--WSDL created by Apache Axis version: 1.4
Built on Apr 22, 2006 (06:55:48 PDT)-->
 <wsdl:types>
  <schema elementFormDefault="qualified" targetNamespace="http://service.com" xmlns="http://www.w3.org/2001/XMLSchema">
   <element name="message">
    <complexType/>
   </element>
   <element name="messageResponse">
    <complexType>
     <sequence>
      <element name="messageReturn" type="xsd:string"/>
     </sequence>
    </complexType>
   </element>
  </schema>
 </wsdl:types>

   <wsdl:message name="messageResponse">
      <wsdl:part element="impl:messageResponse" name="parameters">
      </wsdl:part>
   </wsdl:message>
   <wsdl:message name="messageRequest">
      <wsdl:part element="impl:message" name="parameters">
      </wsdl:part>
   </wsdl:message>
   <wsdl:portType name="ServiceImpl">
      <wsdl:operation name="message">
         <wsdl:input message="impl:messageRequest" name="messageRequest">
       </wsdl:input>
         <wsdl:output message="impl:messageResponse" name="messageResponse">
       </wsdl:output>
      </wsdl:operation>
   </wsdl:portType>
   <wsdl:binding name="ServiceImplSoapBinding" type="impl:ServiceImpl">
      <wsdlsoap:binding style="document" transport="http://schemas.xmlsoap.org/soap/http"/>
      <wsdl:operation name="message">
         <wsdlsoap:operation soapAction=""/>
         <wsdl:input name="messageRequest">
            <wsdlsoap:body use="literal"/>
         </wsdl:input>
         <wsdl:output name="messageResponse">
            <wsdlsoap:body use="literal"/>
         </wsdl:output>
      </wsdl:operation>
   </wsdl:binding>
   <wsdl:service name="ServiceImplService">
      <wsdl:port binding="impl:ServiceImplSoapBinding" name="ServiceImpl">
         <wsdlsoap:address location="http://localhost:9000/AndroidWS/services/ServiceImpl"/>
      </wsdl:port>
   </wsdl:service>
</wsdl:definitions>
Thanks
Subscribe to:
Posts (Atom)
